Social Icons

Pages

Monday, April 30, 2012

Input Devices

Input Devices


A 'keyboard' is a human interface device which is represented as a layout of buttons. Each button, or key, can be used to either input a linguistic character to a computer, or to call upon a particular function of the computer. Traditional keyboards use spring-based buttons, though newer variations employ virtual keys, or even projected keyboards.


In computing, a keyboard is an input device, partially modeled after the typewriter keyboard, which uses an arrangement of buttons or keys, to act as mechanical levers or electronic switches. A keyboard typically has characters engraved or printed on the keys and each press of a key typically corresponds to a single written symbol. However, to produce some symbols requires pressing and holding several keys simultaneously or in sequence. While most keyboard keys produce letters, numbers or signs (characters), other keys or simultaneous key presses can produce actions or computer commands.


In computing, a mouse is a pointing device that functions by detecting two-dimensional motion relative to its supporting surface. Physically, a mouse consists of an object held under one of the user's hands, with one or more buttons. It sometimes features other elements, such as "wheels", which allow the user to perform various system-dependent operations, or extra buttons or features can add more control or dimensional input. The mouse's motion typically translates into the motion of a pointer on a display, which allows for fine control of a Graphical User Interface.The name mouse, originated at the Stanford Research Institute, derives from the resemblance of early models (which had a cord attached to the rear part of the device, suggesting the idea of a tail) to the common mouse.


A joystick is an input device consisting of a stick that pivots on a base and reports its angle or direction to the device it is controlling. Joysticks are often used to control video games, and usually have one or more push-buttons whose state can also be read by the computer. A popular variation of the joystick used on modern video game consoles is the analog stick.


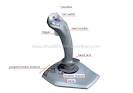
The joystick has been the principal flight control in the cockpit of many aircraft, particularly military fast jets, where centre stick or side-stick location may be employed. Joysticks are also used for controlling machines such as cranes, trucks, underwater unmanned vehicles, wheelchairs, surveillance cameras and zero turning radius lawn mowers. Miniature finger-operated joysticks have been adopted as input devices for smaller electronic equipment such as mobile phones.


The pointing stick is an isometric joystick used as a pointing device. It was invented by research scientist Ted Selker. It is present on many brands of laptops, including IBM's line of ThinkPad laptops, Toshiba Satellite laptops, HP business notebooks and on Dell Latitudes under the name of Track Stick. It has also been observed on computer mice and on some desktop keyboards.

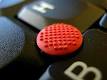
The pointing stick operates by sensing applied force by using a pair of resistive strain gauges. The velocity of the cursor depends on the applied force.


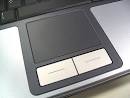
A touchpad is a pointing device consisting of specialized surface that can translate the motion and position of a user's fingers to a relative position on screen. They are a common feature of laptop computers and also used as a substitute for a computer mouse where desk space is scarce. Touchpads vary in size but are rarely made larger than 40 square centimeters. They can also be found on personal digital assistants (PDAs) and some portable media players, such as the Zune using the Zune Pad.


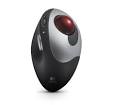
A trackball is a pointing device consisting of a ball held by a socket containing sensors to detect a rotation of the ball about two axes—like an upside-down mouse with an exposed protruding ball. The user rolls the ball with the thumb, fingers, or the palm of the hand to move a cursor. Large tracker balls are common on CAD workstations for easy precision.The trackball was invented by Tom Cranston and Fred Longstaff as part of the Royal Canadian Navy's DATAR system in 1952, eleven years before the mouse was invented. This first trackball used a Canadian five-pin bowling ball.


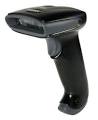
A barcode reader is an electronic device for reading printed barcodes. Like a flatbed scanner, it consists of a light source, a lens and a light sensor translating optical impulses into electrical ones. Additionally, nearly all barcode readers contain decoder circuitry analyzing the barcode's image data provided by the sensor and sending the barcode's content to the scanner's output port.


Magnetic Ink Character Recognition, or MICR, is a character recognition technology used primarily by the banking industry to facilitate the processing of cheques. MICR characters are printed in special typefaces with a magnetic ink or toner, usually containing iron oxide. As a machine decodes the MICR text, it first magnetizes the characters in the plane of the paper. Then the characters are then passed over a MICR read head, a device similar to the playback head of a tape recorder. As each character passes over the head it produces a unique waveform that can be easily identified by the system.


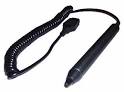
A light pen is a computer input device in the form of a light-sensitive wand used in conjunction with a computer's CRT TV set or monitor. It allows the user to point to displayed objects, or draw on the screen, in a similar way to a touch screen but with greater positional accuracy. A light pen can work with any CRT-based display, but not with LCD screens.


The first light pen was created around 1952 as part of the Whirlwind project at MIT. Since light pens operate by detecting light emitted by the screen phosphors, some nonzero intensity level must be present at the coordinate position to be selected.


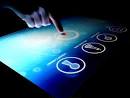
A touchscreen is a display that can detect the presence and location of a touch within the display area. The touchscreen has two main attributes. First, it enables one to interact with what is displayed directly on the screen, where it is displayed, rather than indirectly with a mouse or touchpad. Secondly, it lets one do so without requiring any intermediate device, again, such as a stylus that needs to be held in the hand. Such displays can be attached to computers or, as terminals, to networks. They also play a prominent role in the design of digital appliances such as the personal digital assistant (PDA), satellite navigation devices, mobile phones, and video games.


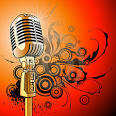
A microphone is an acoustic-to-electric transducer or sensor that converts sound into an electrical signal. In 1876, Emile Berliner invented the first microphone used as a telephone voice transmitter. Microphones are used in many applications such as telephones, tape recorders, hearing aids, motion picture production, live and recorded audio engineering, in radio and television broadcasting and in computers for recording voice, VoIP, and for non-acoustic purposes such as ultrasonic checking. The most common design today uses a thin membrane which vibrates in response to sound ressure. This movement is subsequently translated into an electrical signal.


A webcam is a video capture device connected to a computer or computer network, often using a USB port or, if connected to a network, Ethernet or Wi-Fi.


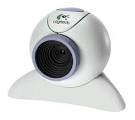
Their most popular use is for video telephony, permitting acomputer to act as a videophone or video conferencing station.This can be used in messenger programs such as Windows Live Messenger,Skype and Yahoomessenger services. Other popular uses, which include the recording of videofiles or even still-images, are accessible via numerous software programs,applications and devices. They are well known for their low manufacturing costs and flexibility.

OUTPUT DEVICES

OUTPUT DEVICES


A
 monitor or display (sometimes called a visual display unit) is a piece of electrical equipment which displays images generated by devices such as computers, without producing a permanent record. The monitor comprises the display device, circuitry, and an enclosure. The display device in modern monitors is typically a thin film transistor liquid crystal display (TFT-LCD), while older monitors use a cathode ray tube (CRT).

Pros:
  • Very high contrast ratio. 20,000:1 or greater, much higher than many modern LCDs and plasma displays.
  • High speed response.
  • Excellent additive color, wide gamut and low black level.
  • Can display natively in almost any resolution and refresh rate.
  • Near zero color, saturation, contrast or brightness distortion. Excellent viewing angle.
Cons:
  • Large size and weight (a 40" unit weighs over 200lbs).
  • Geometric distortion in non-flat CRTs.
  • Older CRTs are prone to burn-in.
  • Warm up time required prior to peak luminance and proper color rendering.
  • Greater power consumption than similarly sized displays, such as LCD.
  • Screened devices are prone to moiré effect at highest resolution (does not apply to triple-tube projection)
  • Intolerant of damp conditions, with dangerous wet failure characteristics.
Pros:
  • Very compact and light.
  • Low power consumption.
  • No geometric distortion.
  • Rugged.
  • Little or no flicker depending on back light.
Cons:
  • Low contrast ratio in older LCDs
  • Limited viewing angle, causing color, saturation, contrast and brightness to vary, even within the intended viewing angle, by variations in posture.
  • Uneven back lighting in some monitors, causing brightness distortion, especially toward the edges.
  • Slow response times, which cause smearing and ghosting artifacts (although many modern LCDs have response times of 8ms or less).
  • Fixed bit depth, many cheaper LCDs are incapable of true color.


A light-emitting diode (LED) is an electronic light source. LEDs are used as indicator lamps in many kinds of electronics and increasingly for lighting. LEDs work by the effect of electroluminescence, discovered by accident in 1907. The LED was introduced as a practical electronic component in 1962. All early devices emitted low-intensity red light, but modern LEDs are available across the visible, ultraviolet and infra red wavelengths, with very high brightness.


LEDs are based on the semiconductor diode. When the diode is forward biased (switched on), electrons are able to recombine with holes and energy is released in the form of light. This effect is called electroluminescence and the color of the light is determined by the energy gap of the semiconductor. The LED is usually small in area (less than 1 mm2) with integrated optical components to shape its radiation pattern and assist in reflection.


C
omputer speakers are external to computers that disable the lower fidelity build-in speaker. They often have a low-power internal amplifier. The standard audio connection is a 3.5mm (1/8 inch) stereo jack plug often color-coded lime green (following the PC 99 standard) for computer sound cards. A plug and socket for a two-wire (signal and ground) coaxial cable that is widely used to connect analog audio and video components. Also called a "phono connector," rows of RCA sockets are found on the backs of stereo amplifier and numerous A/V products. The prong is 1/8" thick by 5/16" long. A few use an RCA connector for input. There are also USB speakers which are powered from the 5 volts at 200 milliamps provided by the USB port, allowing about half a watt of output power.
Some computer displays have rather basic speaker built-in. Laptops come with integrated speakers. Unfortunately the tight restriction on space inevitable in laptops means these speakers unavoidably produce low-quality sound.


In computing, a printer is a peripheral which produces a hard copy of documents stored in electronic form, usually on physical print media such as paper or transparencies. Many printers are primarily used as local peripherals, and are attached by a printer cable or, in most new printers, a USB cable to a computer which serves as a document source. Some printers, commonly known as network printers, have built-in network interfaces and can serve as a hardcopy device for any user on the network. Individual printers are often designed to support both local and network connected users at the same time.Printers that include non-printing features are sometimes called Multifunction printers (MFP), Multi-Function Devices (MFD), or All-In-One (AIO) printers. Most MFPs include printing, scanning, and copying among their features. The world's first computer printer was a 19th century mechanically driven apparatus invented by Charles Babbage for his Difference Engine

Control Unit

Control Unit


A control unit in general is a central (or sometimes distributed but clearly distinguishable) part of whatsoever machinery that controls its operation, provided that a piece of machinery is complex and organized enough to contain any such unit. One domain in which the term is specifically used is the area of computer design. In the automotive industry, the control unit helps maintain various functions of the motor vehicle

Memory Unit


Memory Unit


A

computer's memory can be viewed as a list of cells into which numbers can be placed or read. Each cell has a numbered "address" and can store a single number. The computer can be instructed to "put the number 123 into the cell numbered 1357" or to "add the number that is in cell 1357 to the number that is in cell 2468 and put the answer into cell 1595". The information stored in memory may represent practically anything. Letters, numbers, even computer instructions can be placed into memory with equal ease. Since the CPU does not differentiate between different types of information, it is the software's responsibility to give significance to what the memory sees as nothing but a series of numbers.

Arithmetic Logical Unit

Arithmetic Logical Unit


The ALU is capable of performing two classes of operations:arithmetic and logic. The set of arithmetic operations that a particular ALU supports may be limited to adding and subtracting or might include multiplying or dividing, trigonometry functions (sine, cosine, etc) and square roots. Some can only operate on whole numbers whilst others use floating point to represent real numbers—albeit with limited precision. However, any computer that is capable of performing just the simplest operations can be programmed to break down the more complex operations into simple steps that it can perform. Therefore, any computer can be programmed to perform any arithmetic operation—although it will take more time to do so if its ALU does not directly support

the operation. An ALU may also compare numbers and return Boolean truth values (true or false) depending on whether one is equal to, greater than or less than the other .


Logic operations involve Boolean logic: AND, OR, XOR and NOT. These can be useful both for creating complicated conditional statements and processing Boolean logic.

CPU


 CPU

T
he Central Processing Unit (CPU) or processor is the portion of a computer system that carries out the instructions of a computer program, and is the primary element carrying out the computer's functions. This term has been in use in the computer industry at least since the early 1960s. The form, design and implementation of CPUs have changed dramatically since the earliest examples, but their fundamental operation remains much the same.
The control system's functions are as follows:
1.     Read the code for the next instruction from the cell indicated by the program counter.
2.     Decode the numerical code for the instruction into a set of commands or signals for each of the other systems.
3.     Increment the program counter so it points to the next instruction.
4.     Read whatever data the instruction requires from an input device. The location of this required data is typically stored within the instruction code.
5.     Provide the necessary data to an ALU or register.
6.     If the instruction requires an ALU or specialized hardware to complete, instruct the hardware to perform the requested operation.
7.     Write the result from the ALU back to a memory location or to a register or perhaps an output device.

Logical diagram of computer system


Logical diagram of computer system


 INTRODUCTION TO COMPUTER SYSTEM


                   A set of devices which includes input unit, central processing unit (Primary memory, Arithmetic and Logic Unit, control Unit) and output unit together with secondary storage is known as computer system. In other word, a computer system is a data processing device which following specific instructions, performs a sequence of operations to achieve a desired result. Specially, computer receives input (data or/and instructions) through the input device, processing the data according to the specified instructions in the CPU presents the output result in a readable form on the output device on the paper or CD-ROM or speaker, etc.
The CPU is like the human brain, it has a memory; and just like there is a faculty in the brain, which regulates the functioning of all parts of the body, it has a control unit which regulates all the parts of a computer including its input and output devices. Processing of data is done in the arithmetic and logic unit (ALU). The word “Logic” is used because a computer (Unlike a calculator) has a capacity to compare two numbers, to find out which of the two is greater and then proceed accordingly.
Under the direction of the control unit from the input device (say keyboard) to the primary memory unit, the input is released. The control unit directs the requisite part of input to be sent to the ALU for being processed. After the processing is completed, the control unit directs the ALU to release the processed output to the primary memory. Then, finally the output is released from the memory to the output device, which is directed to accept the output and display or print it. This functioning is described with the help of the direction of arrows in the following diagram. This diagram is called Logical Diagram of Computer System.


Macromedia FreeHand


Macromedia FreeHand


Macromedia Freehand is application software which is developed by Macromedia Corporation, U.S.A. It is especially used in graphic designing. In the market user generally use this application for magazine, newsletter, book, advertisement, pam-plate and many different types of hand designing or publishing. We can get different up-grade versions in the market.
How to Load?
·        Click on Start menu and choose program.
·        Click on Macromedia then click on Macromedia FreeHand. (You will get FreeHand screen)
Tools
1.     Pointer Tool:  This tool is used to select, move or resize objects.
2.     Pen Tool: Draw paths by place in curve, corner, and connector points, adjusting them as you draw. The pen tool draws a curved path as a Bezier curve.
3.     Bezigon Tool: Draw straight lines and arcs by placing curve, corner, and connector points.
4.     Eyedropper Tool: This tool is used to pick the color one figure to another.
5.     Text Tool: This tool is used to insert a text block.
6.     Arc Tool: This tool is used to insert arc-figure.
7.     Spiral Tool: This tool is used to make the spiral in the required place.
8.     Line Tool: This tool is used to make the line in the required place.
9.     Ellipse Tool: This tool is used to make ellipse or circle in the required place.
10.            Rectangular Tool: This tool is used to insert a rectangular box or square.
11.            Polygon Tool: This tool is used to insert a multisided figures like hexagon, tetragon etc.
12.            Knife Tool: This tool cuts a selected, ungrouped path, yielding either open or closed paths. For this select a path and drag the knife tool across the path.
13.            Freeform Tool: Push or pull any part of the path. The freeform tool automatically adds points, deletes points or changes point type along the path as you edit the path.
14.            Rotate Tool: Use the transform panel to rotate an object at a precise angle.
15.            Scale Tool: Use the transform panel to scale an object by an exact percentage.
16.            Skew Tool: Use the transform panel to skew an object at a precise angle.
17.            Trace Tool: Trace any type of object that can appear on screen in a freehand document. The trace tool automatically traces graphics according to the settings in the trace tool dialog box.
18.            Perspective Tool: Use the perspective tool to attach an object to the perspective grid to give it a three-dimensional appearance.
19.            Page Tool: This tool is used to add, modify, duplicate and delete pages.
20.            Zoom Tool: The zoom tool lets you magnify or reduce the display of any area in your publication. You can also double-click the tool to jump to Actual size, or press Alt as you double-click the tool to go to fit in Window view.


File Menu
1.     Revert: Erases all changes made to the document since the last save. You cannot undo the revert command.
2.     Import: This command is used to import the text or document which is exported from another program.
·        Click on file menu and click on import.
·        Choose you required file name.
·        Click on open.
·        Click on any-one place.
3.     Export: This command is used to export the required text or document, one program to another.
·        Click on file menu and click on export.
·        Type the file name in the file name box.
·        Click on save.
4.     Report: This command is used to view the report option in the required file.
·        Click on file and click on report.
·        Click on ok.
·        Type the file name in the filename box.
·        Click on cancel.
5.     Collect for output: The collect for output command gathers components needed to print the current document and copies those components to a common location.
·        Click on file menu and click on collect for output.
·        Choose default option.
·        Click on ok.
6.     Print: Printing from FreeHand is straightforward, even when you require high-resolution, professional quality output, Powerful, prepress capabilities include the following:
·        Click on file menu and click on print.
·        Set the available option.
·        Click on ok.
7.     Publish HTML: Use Freehand's publish as HTML feature to instantly convert your FreeHand document to a web page.
·        Click on file menu and click on publish to HTML.
·        Type the file name and click on save as HTML.
·        Click on close.
8.     Preference: This command is used to set the different type option in the freehand program.
·        Click on file menu and click on preference.
·        Set the available option.
·        Click on ok.
9.     Customize Toolbar: The form. Location and contents of all toolbars are customizable. The status bar is customizable only in windows.
·        Click on file menu and select on customize.
·        Click on toolbar, (Choose the any one toolbar command) Click on ok.
10.            Shortcuts: Use the shortcuts panel in the customize dialog box to change current keyboard shortcuts or to assign shortcuts to commands that have no shortcuts types of commands.
·        Click on file menu and click on customize.
·        Click on shortcuts. (Set the available short cut key)
·        Click on assign.
·        Click on close. (We can see different types of shortcut)
Edit Menu
1.     Copy Special: Makes a copy of selected objects and stores it on the FreeHand clipboard in the specified format.
·        Type the text or document.
·        Select it and click on edit menu.
·        Click on Copy special and choose your required program.
·        Click on ok.
2.     Paste Special: Places objects stored on the clipboard into the active document in the format you select. This is useful for controlling the format in which items from other applications are pasted into FreeHand.
·        Click on edit menu and click on paste special.
·        Choose any one program and click on ok.
3.     Pate in Front: Pastes an object stored on the FreeHand clipboard directly in front of a selected object in the stacking order.
4.     Past Behind: Pastes an object stored on the FreeHand clipboard directly behind a selected object in the stacking order.
·        Click on edit menu and click on paste behind.
4.     Pate Inside: Use paste inside to crop or mask an object within a closed path which is copied.
·       Select the any one figure.
·       Click on edit menu and click on paste inside.
5.     Attributes: Copies the attributes of the selected objects or text to special attributes only clipboard during the current freehand session until copy attributes is performed again.
·        Select the required figure.
·        Click on edit menu and click on copy an attributes.
·        Select the logo
·        Click on edit menu and click on paste on attributes.
6.     Paste on attributes: This command is used to paste the required color which is copy on attributed.
·        Select the required logo.
·        Click edit menu
·        Click on paste on attributes.
7.     Duplicate: This command is used to duplicate in the text or document which is selected
·       Make the text or document and select it.
·       Click on edit menu and click on duplicate.
8.     Clone: Creates an exact copy of the selected object and positions it directly on top of the original.
·        Make the text or document and select it.
·        Click on edit menu and click on clone.
9.     Select:
All: This command is used to select the whole text or document.
·       Click on edit menu and select on select.
·       Click on all.
All in document: This command is used to select the whole the text or document.
·        Click on edit menu and select on select.
·        Click on all in document.
None: This command is used to deselect the whole text or document which is selected.
·        Click on edit menu and click on select.
·        Click on none.
Invert Selection: This command is used to reselect the whole text or document which is deselected.
·        Click on edit menu and select on select.
·        Click on invert selection.
10.            Find & Replace:
Text: This command is used to find the text.
·        Place the courser in the beginning text.
·        Click on edit and click n find and replace.
·        Click on text.
·        Type the text which you want to find out.
·        Click on find.
Click on ok. Graphic: This command is used to change the required color one figure to another figure.
·        Click on edit and click on find and replace. Click on graphic.
·        Choose the required color and click on change.
·        Click on close.
11.            External editor: This command is used to view the required file which is imported.
·       Click on edit menu and select on external editor.
·       Click on close.
12.            Links: This command is used to view the required file information which is imported files.
·        Click on edit menu and click on links.
·        Click on ok.

View Menu

1.     Fit All: Changes the view so all pages fit inside the document window.
·        Click on view menu.
·        Click on fit all.
2.     Fit Selection: Changes the view so all selected objects fit inside the document window.
·        Click on view menu and click on fit selection.
3.     Fit to Page: Changes the view so the entire active page fits inside the document window.
·        Click on view menu and click on fit selection.
4.     Magnification: Reduces or enlarges the document view at present or custom percentages. To adjust magnification, choose a percentage from the magnification pop-up at the lower-left corner of the document window, or enter a value between 6 and 246,000.
·        Click on view and click on magnification.
·        Choose any one percentage number style.
5.     Hide Selection: This command specially used to hide specific objects. For this
·       Select the object and then choose view menu.
·       Click on hide selection.
6.     Show All: To show all hidden objects.
·        Click on view menu and click on show all.
7.     Toolbar: This command is used to hide the whole toolbar in the freehand screen.
8.     Panels: Shows or hides all panels except the toolbox.
9.     Page Ruler: Shows or hides the horizontal and vertical rulers in the document window.
10.            Text Ruler: Shows or hides text rulers on the top of text blocks.
11.            Grid: This shows or hides a non-printing grid. For use this;
·        Click on view menu.
·        Select grid.
·        Click on show.
Modify Menu
1.     Transform:
Scale: Use the transform panel to scale an object by an exact percentage. Select the object, enter settings in the transform panel, and click apply.
·       Make the figure and select it.
·       Click on modify menu and select on transform.
·       Click on scale.
·       Type the scale number in the scale box then press enter.
Move: Move objects by precise distances, as entered in the transform panel.
·        Make the figure and select it.
·        Click on modify menu and select on transform.
·        Click on move.
·        Type the move number in the x-axis and y-axis box then press enter.
Rotate: Rotate a selected object around a fixed point.
·        Make the required figure and select it.
·        Click on modify menu and click on transform.
·        Type the round number in the rot onion angle box then press enter.
Reflect: Flip a selected object horizontally or vertically.
·        Make the required figure and select it.
·        Click on modify menu and click on transform.
·        Now type the reflect number then press enter.
2.     Arrange:
Bring to Front: Moves selected objects to the front of any overlapping objects. Unavailable if no objects are selected, or no publication is open.
·        Select the back logo.
·        Click on modify menu and select on arrange.
·        Click on bring to front.
Bring Forward: Moves selected objects to the back of any overlapping objects. Unavailable if no objects are selected or no publication is open.
·        Select the back logo.
·        Click on Modify menu.
·        Select arrange.
·        Click on send to back.
Send to Back: Moves selected objects to the back of any overlapping objects. Unavailable if no objects are selected or no publication is open.
·        Select the front logo.
·        Click on modify menu.
·        Select on arrange.
·        Click on move to backward.
Send Backward: Moves selected objects up one level in a stack of overlapping objects. Unavailable if no objects are selected or no publication is open.
·        Select the front logo.
·        Click on modify menu and select on arrange.
·        Click on move backward.
3.     Align: Show or hide the align panel, which aligns and distributes objects or points I relation to one another or in relation to the page.
·        Select the text or document.
·        Click on modify menu and click on align.
·        Choose the any align style.
·        Click on apply.
4.     Join: Link two or more paths or connects two endpoints.
·        Select corners.
·        Click on modify menu and click on join.
5.     Split: Split an object into smaller or component paths which is selected the join document.
·        Click on modify menu and click on split.
6.     Combine:
Blend: Create a number of intermediate steps between two paths, composite paths, or groups.
·        Select t he more figures.
·        Click on modify menu and select combine.
·        Click on blend.
Join Blend to Path: Use join blend to path to attach a blend to a path.
·        Select the more figure.
·        Click on modify menu and select combine.
·        Click on join blend to path.
Union: Create a single path from two or more selected, closed paths. Use union to combine two overlapping paths and remove portions of the paths that cross over each other.
·        Select the more figure.
·        Click on modify menu and select combine.
·        Click on Union.
Intersect: Intersect creates a single path from the portions of selected paths that overlap, removing the remaining portions of the paths. The intersection you create intermits the stroke and fill of the backmost, selected path.
·        Select the more figure.
·        Click on modify menu and select combine.
·        Click on Intersect.
Pinch: Creates a hole in selected closed paths, through which other objects are visible.
·        Select the more figure.
·        Click on modify menu and select combine.
·        Click on pinch.
Crop: Crop operates like a cookie cutter on the selected objects. This feature takes two or more objects and crops the bottom paths to the shape of the topmost path in the stacking order.
·        Select the more figure.
·        Click on modify menu and select combine.
·        Click on Crop.
7.     Alter Path:
Correct Direction: When used on composite paths, correct direction attempts to ensure that paths inside composite paths run in opposite directions, so the object appears correct if even/odd fill is unchecked in the object inspector.
·        Click on modify menu then select alter path.
·        Click on correct direction.
Reverse Direction:  Reverses the direction of one or more selected paths. Reversing the direction of the path doesn’t alter the shape of a path.
·        Click on modify menu then select alter path.
·        Click on reverse direction.
Remove Overlap: Removes redundant portions of a selected, closed path that crosses itself.
·        Click on modify menu then select alter path.
·        Click on remove overlap.
Simplify: Removes or adds points to a path to maintain the same shape using the optimum number of points for efficient editing and printing.
·        Click on modify menu then select alter path.
·        Click on simplify then type the simplify amount.
·        Click on apply and click on ok.
Expend Stock: Converts the perimeter of a specified stroke of a selected path into a closed path.
·        Click on modify menu then select alter path.
·        Click on expend stock then type the expend stock.
·        Click on ok.
Inset Path: Create a second path with the same contours inside or outside the original path, positive values yield paths inset from the original: negative values yield paths outlining the original.
·        Click on modify menu then select alter path.
·        Click on expend stock then type the step and insect no.
·        Click on ok.
8.     Lock: Locks selected objects in place on a layer to prevent accidentally moving, modifying, cutting, or deleting them.
·        Select the text or document.
·        Click on modify menu and click on lock.
9.     Unlock: Unlocks a selected, locked object.
·        Select the lock logo.
·        Click on modify menu and click on unlock.

10.            Group: Freezes two or more sele3cted objects or path points in relation to one another. When modifying groups, they act as a single unit, while each object within the group retains its individual attributes.
·       Make the logos and select them.
·       Click on modify and click on group.
11.            Ungroup: Separates a group into individual objects. Ungrouped objects can be individually modified. Ungroup objects created with the rectangle and ellipse tools in order to modify their path points. With groups selected, you can also click on the main toolbar to ungroup objects.
12.            Symbol:
Convert to Symbol: This command is a used to convert the text or document from symbol.
·        Type the text and make the document.
·        Select it.
·        Click on modify and click on symbol.
·        Click on convert symbol.
Cursor Distance: Enter a value in the arrow key field to specify the distance selected objects move when you press an arrow key on the keyboard. Values are related to the unit of measurement currently selected. Enter a values are related to the unit of measurement currently selected. Enter a value in the shift+arrow key field to specify the incremental instance selected objects move when you press an arrow key while holding the shift key on the keyboard.
·        Click on modify and click on cursor distance.
·        Set the cursor distance number in the arrow key distance box.
·        Click on ok.
Text Menu
1.     Font: Lets you select the font for a selected range of text, a default for a single publication, a default for all future publications or the next text you place or type in.
·        Type the text and select it.
·        Click on text and click on font.
·        Choose any one font style.
2.     Size: Lets you specify text font size in points for a selected range of text as a default for a single publication, or as a default for all future publications. Use the other command to specify text font size from 4 to 650 points in 0.1 point increments.
·        Type the text or document.
·        Click on text and click on size.
·        Choose any one size style.
3.     Type Style: This command is used to change the text from different style like Italic, Plan, and Bold Italic etc.
·        Type the text and select it.
·        Click on text and click on type style.
·        Choose any one command.
4.     Effect:
Highlight: Surround the selected text with a gray box.
Inline: Draw an outline ground each letter of the selected text, similar to the effect of Inset path.
Shadow: Create a gray shadow behind the selected text.
Strikethrough: Draw a line through the middle of the selected text.
Underline: Draw a line below the selected text.
Zoom: Apply a 3D effect on selected text.
5.     Align: This command is a used to set the different type of place in the required text form whole command.
6.     Leading: Leading in FreeHand is calculated from the baseline of one line of text to the baseline of the next. When assigning leading from the text menu.
7.     Convert Case: This option is used to convert the selected document to UPERCASE, lower case, Sentence case, Title Case and so on.
8.     Spelling: This command is used to check the spelling and grammar in the required text.
·        Type the text.
·        Place the cursor in the beginning text.
·        Click on text and click on spelling.
·        Click on start.
·        Choose any one suggestion then click on change.
·        Click on close.
9.     Round around Selection: This command is used to insert the bitmap image form round around selection style.
10.            Flow:
Inside Path: This command is a used to flow the text form figure inside.
Detach From Path: This command is used to bring the old position which is flow inside path.
Attach to Path: This command is used to convert the text forms the required figure.
11.            Convert to Path:  This command changes the selected text into editable vector objects.
·       Type the text and select it.
·       Click on text and click on convert to path.

Xtras Menu
1.     Cleanup: This command is used to correct direction, reverse direction, remove overlap and simplify etc as done as modify menu from alter path command.
2.     Color: This command is used to increase to decrease in the different types of color in the required figure from whole command which is inserted.
·       Select the required figure.
·       Click on extras menu.
·       Click on color.
·       Choose any one color style.
·       Set the color position.
·       Click on ok.
3.     Create: This command is used to blend, emboss or trap as done as modify menu from combine command.
4.     Distort:
Add Point: This command is used to add nodes in the required figure.
·        Select the required figure.
·        Click on extras and click on distort.
·        Click on add point.
Fertilize: This command is used to given by the different types of safe in the required figure.
·        Make the figure and select it.
·        Click on xtras and click on factorize.
5.     Path Operations: This command is used to crop, divide, expand stroke, insect pinch, insect, pinch, union, and transparence.

Window Menu
1.     New Windows: This command is a used to create the new window screen.
2.     Toolbars: This command is used to hide and display the different types of toolbar.
3.     Extra Tool: This command is used to create different types of safe form.
4.     Extra Operation Tool: This command is used to given by the different types of safe form which can not create from extra tool.
5.     Panels: This command is used to display or hide the different types of panels from freehand screen.